Have you ever faced a situation in which your camera can’t possibly cope with the amount of dynamic range in a specific scene and all you can do is exposing for either the shadows or the highlights or average out the exposure but you still do not get the picture you want or it still doesn’t look anything like what your eyes see? Well that’s because your eyes has the ability to capture a lot more dynamic range when compared to your camera sensor or film. So here is where a technique called HDR comes in.
Of course nowadays when we talk about HDR we think of ridiculously saturated and high contrast pictures that would most likely come out of a smartphone. But this technique dates all the way back to the 1850s wheN a photographer would use multiple exposures on different negatives, each one exposing for a particular part of the scene (shadows, highlights and midtones), and then combining them into one picture while creating a positive which would represent the actual scene.
But that was then, in this digital age it’s much easier to create an HDR image because we do not have to deal with negatives, chemicals and other darkroom equipment anymore but the principle still remains the same, combining multiple exposure into one single image. We could do this right in our camera (if your model supports it), inside of Photoshop and Lightroom or inside of an HDR processing software. In my experience I have found that processing in Photoshop and Lightroom gives the best results.
So, in this article I would go through the process of creating an HDR image starting from deciding whether to go HDR or not, if so, bracketing the shot and then post processing.
But first, should I use HDR at all?
In short, HRD works best with a non-moving subject like a landscape shot and in a scene where you are unable to capture the shadow and highlight details to your own satisfaction. So if your subject is not moving and you’re not satisfied with the amount of details capture in the shadow and highlight area, go HDR. In the end, HDR is all about personal preference.
Now here are the steps in creating HDR images:
First off, this is the equipment you would need, apart from your camera and lens: a sturdy tripod, a shutter release and as software I suggest Photoshop CS2 or later and Lightroom 4 or later.
The steps will largely be the same. We will be doing a 5-exposure HDR composite image. Meaning we will blend 5 exposures to create this one image, you could be doing 3 or 7 depending on your preference.
Step 1: Set your camera on a tripod and hook up your shutter release cable to your camera or if you are using a wireless remote then set the drive mode on your camera to “Remote.” Compose your shot.
Step 2: Set your camera to manual mode and pick an ISO, the lower the better, I recommend ISO 100. Pick a suitable aperture for the scene (this CANNOT change throughout the sequence) and set the shutter speed to get an exposure value of -2 and take the shot. Then do the same for -1, 0, +1 and +2. With this you will most likely have captured all the dynamic range in your scene.

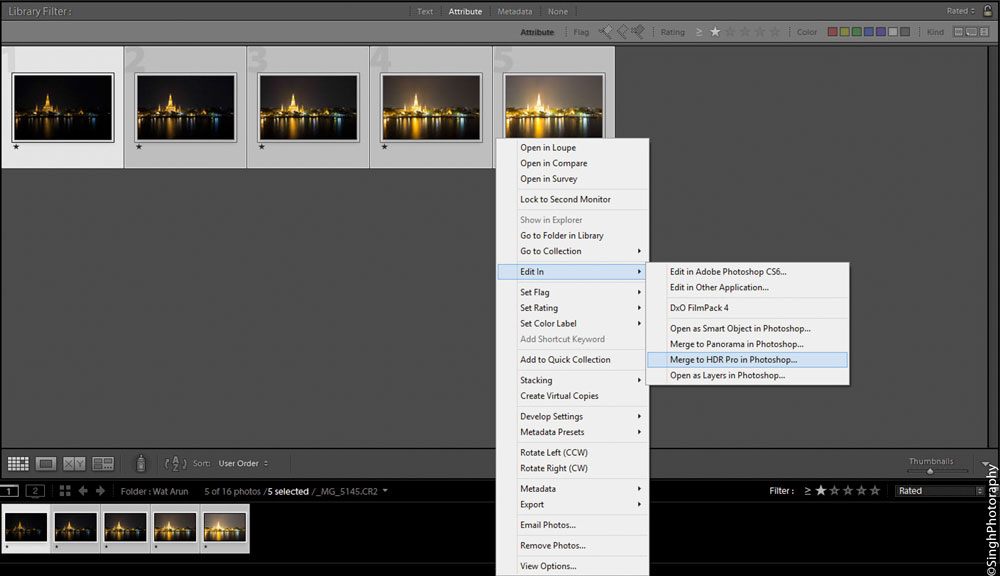
Step 3: Load this up into Lightroom, select all your sequence and right click, select “Edit In” → “Merge to HDR Pro in Photoshop…” — his will fire up Photoshop.
Now just wait and let it do its work. This could take anywhere from 2 to 15 minutes depending on the size of your file, the amount of files you are merging, your computer’s performance, etc.
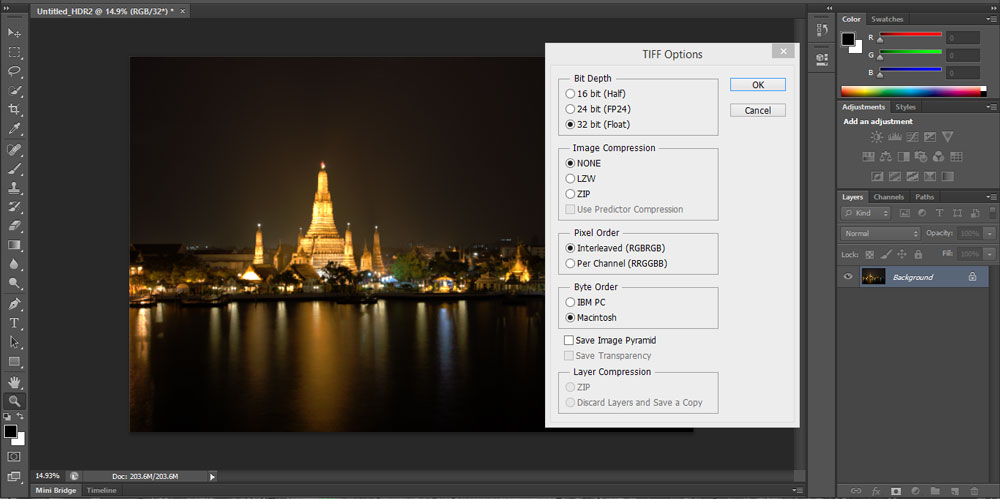
Step 4: Once done you will see this pop up window from Photoshop and you are probably thinking, “My HDR is cr*p!” Now on this window you will need to change the “Mode” from 16 bit to 32 bit.

Once done, the window will lessen its sliders and present you with a single histogram. You can adjust this histogram’s slider until the picture looks okay and more realistic. Press “OK” to confirm your settings. This will open up the usual Photoshop window with your picture ready to be saved.
Step 5: Here you will notice that you cannot apply much of Photoshop’s filters and adjustments. This is due to the fact that most Photoshop features are not equipped to handle editing of a 32 bit image. So we will save this file as a 32 bit TIFF file and open it in Lightroom which is capable of editing a 32 bit image. “File” → “Save As…” — select file type as TIFF and in the popup windows use the following settings.
Step 6: Import the newly saved 32 bit TIFF into Lightroom and you will notice that the exposure slider can now go from -10 to +10 compare to a regular RAW file which can only go from -5 to +5.
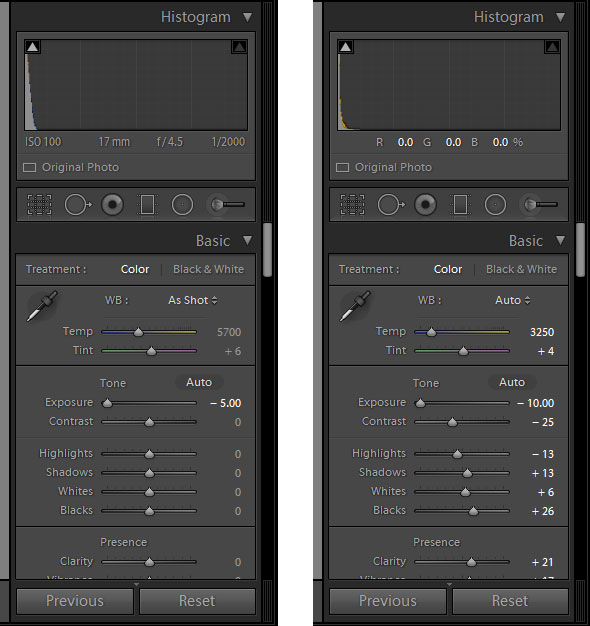
This is due to the fact that a 32 bit image file contains more information when compared to a regular 12 or 14 bit RAW file. With this you can now do your local adjustments or global adjustments until you are satisfied with your HDR image.
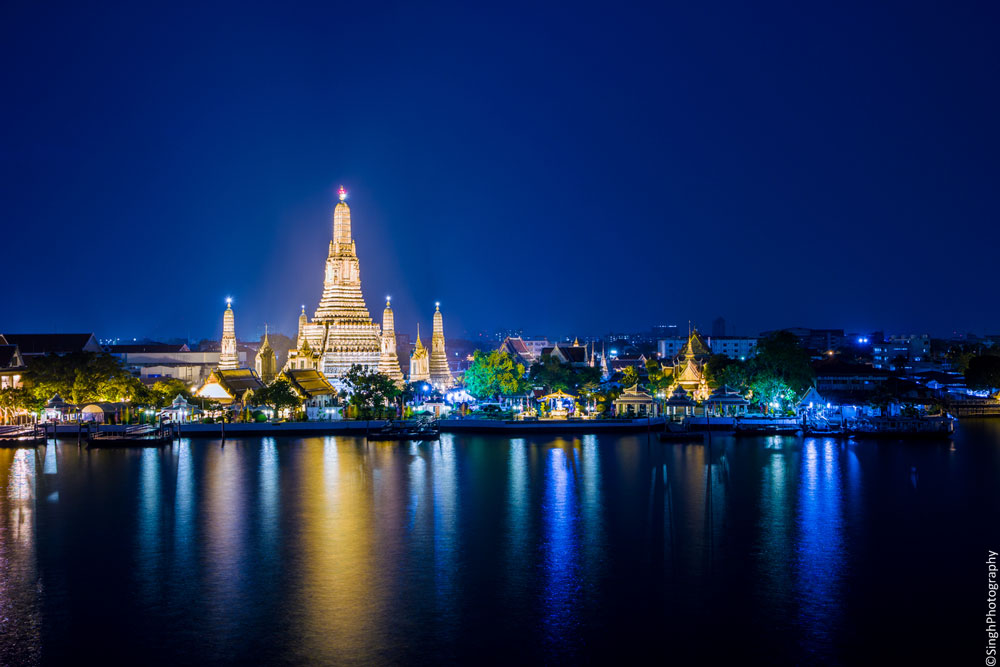
Et voilà, the final image: